Wednesday, May 27, 2009

Sweet Cicely - Myrrhis odorata

Meet my Sweet Cicely!
I bought a tiny plant from the Scarborough Horticultural Society about 5 or 6 years ago and planted it into my garden. It was only about 3 inches high at that time and I had no idea what it was. The following year it grew to a height of over 3 feet! It didn't flower the first year, so I wonder if it is a biennial, but according to every source I have read it seems to be a herbaceous perennial. After that year, my Sweet Cicely keeps getting bigger and the number of flower stems increase. This is what it looks like right now. It also seeds itself into other parts of my garden, but it is not invasive. Any seedlings can be dug up and transplanted.


Sweet Cicely has triangular-shaped feathery leaves. They add a graceful lacy look to the garden and can grow to a foot or larger. Their light green colour and shape are a good contrast to other foliage. They also taste and smell like licorice or anise. The flowers are white and are borne in large umbrels above the plant. The seeds are dark in colour when ripe and resemble fennel and caraway.

All parts of this plant are edible. It has been used in many ways. The seeds have been pounded and used as a furniture and floor polish. All parts of the plant have been used in medicine. The roots have been boiled and used as a remedy for stomach disorders. The plant is currently being studied for as an artificial sweetener for diabetics. The roots have been used as an antiseptic.

In the kitchen, the leaves have been used in salads, soups, stews and as a sweetener for desserts. The roots can be cooked and eaten as a vegetable or chopped and added cold to salads. Unripe seeds can also be added to salads.

I have never had the courage to use this herb for anything other than a garden plant, but I may try a recipe or two this summer. There are many on the Internet. Having said all of this, I want to warn you that there are several other plants that look very similar to Sweet Cicely, but are highly poisonous. Just a precaution!

Family: Apiaceae. Genus: Myrrhis. Species: M. odorata
Common Name: Sweet Cicely

Sunday, May 24, 2009

Virginia Bluebells - Mertensia virginica

One of my favourite plants in the garden right now is Virginia Bluebells. This plant has distinctive bell-shaped flowers that start out pink and turn blue as they mature. If this plant resembles Pulmonaria it is because they are in the same family, Boraginaceae. My Virginia Bluebells are in bloom at the moment and I love their clusters of blue flowers! The leaves are large and oval shaped. They are a lovely light green colour that reminds me of spring! They like a partial shady location and enjoy a forest type setting. Mine are growing under the peach tree, but they don't seem to mind.


This plant will continue to flower for several weeks. Then they will die back. Bluebells are ephemeral perennials. That means that their foliage will totally disappear from the garden by July as they go dormant until next spring.


Family: Boraginaceae. Genus: Mertensia. Species: M. virginica
Common name: Virginia Bluebells, Virginia Cowslip.

Saturday, May 23, 2009

Back to Nature Part 3

Another fascinating native plant is called Wild Ginger. It is a very low-growing woodland plant. The leaves are an interesting heart shape. It produces very unusual dark brownish to deep burgundy flowers at ground level. The flowers are not visible from above the plants. Ants pollinate the flowers. Wild Ginger reproduces by rhizomes or seeds.

Although Wild Ginger is not related to the ginger root that you can buy in a grocery store, it can be used to flavour many dishes. Early pioneers used it fresh or dried as a ginger substitute. It is also said to have medicinal properties. Aboriginal peoples used this plant as a cure for many ailments, including digestive disorders.

I dug this little plant up because it had seeded itself into another part of the garden where I did not want it. I am going to give it to my daughter to plant in her garden. She is eager to grow a large patch of them so that she can experiment with using this plant as a ginger substitute! I was able to take a photo of the flower this way too!


Family: Aristolochiaceae. Genus: Asarum. Species: A. canadense
Common name: Wild Ginger

Back to Nature Part 2

Another plant which I have introduced into my garden is called a May Apple. It is part of my mini woodland garden. The leaves of this plant are awesome! They are large and palm shaped. Each plant has two leaves growing up from a central stem.


They bear a single white flower in between the two leaves. The flower will eventually mature into a greenish fruit, which resembles an apple. These apples are edible when ripe, but only in small quantities. I will not be eating these! Large amounts are toxic!

This plant reproduces by root growth. The single plant I planted many years ago has grown into a nice grouping. The roots of this plant are highly toxic! I have always loved this plant since I was a young girl. It was one of the first plants I was introduced to when we first came to Canada. It grew wild all around and near our house!

Family: Berberidaceae. Genus: Podophylum. Species: P. peltatum.
Common name: May Apple


Back to Nature Part 1


Don't get me wrong! I love colour and I love flowers, but over the years I have become interested in returning back to the way things were, especially when it comes to my plants. I have been putting plants into my garden which may have grown in this area centuries ago.

The area we live in used to be part of the Carolinian Rain Forest - a huge forest which covered a vast area from the Carolina's to just north of here. Most of the forest has been cut back to make way for people and progress. Some organizations are becoming involved in preserving whatever is left of the original forests. Our Rouge Valley is one of these areas. Conservationists want to keep this forest alive. Many of the original species have died out and there is not much that can be done if we keep cutting down trees and building new homes. But the interesting thing is that a lot of the flora and fauna are returning to our area.

I am helping things along a bit by planting some of the native species in my garden. This first one is called Solomon's Seal. I bought one small plant about 7 years ago at a local plant sale. I planted it under my apple tree because I was told it liked a sort of shady woodland setting. I guess it is really happy here because there are now about twenty plants! They multiply by a travelling root system, but they are not invasive.

Solomon's Seal has graceful, arching stems with long oval shaped leaves which are borne on the stems symmetrically. I love the rows of tiny white flowers that dangle in pairs like little white bells under the stems. They look like a string of pearls to me. (Sorry about the photo. These are growing way back in my garden and I can't get close enough in my wheelchair to take a good photo.)

Family: Ruscaceae. Genus: Polygonatum Species: P. biflorium

Common name: Solomon's Seal

Tuesday, May 19, 2009

Purple Blooms and Blue Skies

I have several different kinds of irises in my garden. Iris are in the same family as crocuses, gladiolas and freesias. Their roots are usually a bulb or corm. The leaves are long and slender and pointed at the end. Irises were never a favourite flower of mine until recently. Now I think I want to study them a bit better and maybe buy a few new ones. I think I would love to have a yellow or peach coloured one. (or two)

The first photo is of a bulb type of iris. It is called, Iris Reticulata. I planted these irises many years ago. It was spring time and I bought a couple of flowering pots in a small store in the Beach Area of Toronto. I had never seen anything like them before. They were breathtaking as they sat on my kitchen table for a couple of weeks! After they finished blooming, I planted them in my garden and promptly forgot about them. Imagine my surprise and joy the following spring when these wonderful irises came up and bloomed long before anything else was even alive in the garden. Just to show you how early these things are, this photo was taken on April 15th of this year.


The next irises are dwarf irises. They were in the yard when we moved into this house. I have moved them about many times and by the look of things, they will probably have to be moved again as other plants have taken over their space. I have no idea what variety I have. They are just pretty irises to me. I also have a tall iris, but it is not in bloom yet.


Family: Iridaceae. Genus: Iris


Common name: Iris.

This one is sort of a medium tall iris. I don't remember the variety, but it is very beautiful too!


And now a sky photo. I have noticed several blogs with sky pictures on them. I love sky photos! They are never the same twice! Our weather has been strange lately. On the weekend we still had night frost. Today was a nice, sunny springlike day. But the next few days are going to be hot and humid. Temperatures of 29C are expected. From frost to a humidex in one week!


Sunday, May 17, 2009

Blossom Time

Spring means blossom time in my garden. I don't have much space, but I do have enough room for an apple tree, a sour cherry tree and a peach tree.

The blossoms on the cherry tree were just bursting about a month ago.

And this was the cherry tree about three weeks ago. It was loaded with beautiful white blossoms. The blossoms are now gone, but the cherries will be ripe in July. I will harvest them at that time and make sour cherry jam!


My peach tree was in full bloom a week or so ago. The peaches from this tree are absolutely delicious! That is, if I can get to them before the squirrels do. It is always a race to see who gets them first. Usually I lose!


This is how my apple tree looked today. I sat outside and enjoyed the sunshine and the occasional whiff of apple blossom when the wind blew their wonderful scent in my direction. Heavenly! This tree has five different varieties of apple on it. I bought it because I thought that was interesting. I have never sprayed my trees and the apples from this one are usually already inhabited by wormy things before they are ripe. I have yet to eat one of them without first cutting it into quarters in order to evict the tenants,

Saturday, May 16, 2009

Forget Me Not - Myosotis

I love blue flowers! Maybe that is why I like Forget Me Nots so much! This plant has followed us as we moved. I took a plant or two with me each time from garden to garden. They continue to come up faithfully every spring. Some years everything is covered by a blue haze for a few weeks. I never pull them up before they have finished blooming.


Once they have flowered, I pull them out if they are taking over and crowding out another important plant. I always leave a few so that they can seed themselves and I will continue to be able to enjoy them in future years. Myosotis is a biennial. The seeds will grow into small plants and then go dormant until the next spring when they bloom.

There are all kinds of legends on how this plant got it's name. One is that when God was giving out names to the plants, he forgot this one and it called out to him, "Forget me not!" Other legends are love related. A medieval knight was walking along a river with his true love. He picked her a bunch of Forget Me Nots. Because his armour was so heavy, he fell into the river, but before he hit the water, he was able to throw the bunch of blue flowers to his lady, while yelling, "Forget me not!"

There are 50 species of Myosotis. I have no idea which one I have. The first Forget Me Nots that I planted were blue. And although these plants usually have blue flowers, sometimes a plant will have pink flowers. I usually leave the pink flowering ones to go to seed. I really like the pink ones too. Myosotis also come in white, but I guess my plants don't have any white genes. Maybe I should buy a pot of white Forget Me Nots this year! Add some new genes to the pool.

Family: Boraginaceae. Genus: Myosotis.
Common name: Forget Me Not

Friday, May 15, 2009

House Block for the Yokohama/Toronto Wallhanging - Instructions Part II

Here are more instructions for the Yokohama/Toronto wall hanging.

Start with the house piece first. Place and pin it onto the prepared background fabric about 1in. to 1 1/2in. from the bottom edge of the fabric. The top of the house piece is left open and unbasted. Using the applique stitch, stitch around three sides of the block, leaving the top of the house unstitched and unbasted and starting on one side. When you have finished stitching the piece, you can remove the basting stitches and pull the freezer paper out.


A few words about freezer paper applique that you might find interesting.
The freezer paper can be used again and again. If you iron it onto fabric and feel that it is not in the right place, you can remove it, replace it, and iron again. This re-use is also handy if you are doing a lot of one shape, such as leaves. You can do a few leaves, take the freezer paper out and re-use the shapes. It can mean a lot less tracing and cutting! Now let's get back to the appliqueing.
Place the roof section onto the block. Pin it where you want it. It should overlap the house piece by about a 1/4 inch. Now pin the chimney pieces in place, tucking the unstitched bottom of the pieces under the roof section by about 1/4 inch. The chimneys will be appliqued before the roof section, so do them next.
Now continue to place the rest of the pieces onto the block as desired. Applique them in place. Don't forget to remove the basting stitches and freezer paper when you are about an inch or so from where you started stitching the piece. Then continue to applique the rest of the piece.

Happy Stitching!

House Block for the Yokohama/Toronto Wallhanging - Instructions Part I

Here are the instructions for block #4 of the 'Tale of Two Cities - Yokohama/Toronto" wall hanging. The finished block can be seen here.

First, prepare the background fabrics. Mark a rectangle measuring 3 inches by 9 inches. Cut out leaving a fairly wide 1/4 inch seam allowance. (The applique might make the piece smaller when it is finished and you want to be sure that you have a piece measuring exactly 9 inches square plus seam allowance.)

Next Mark a rectangle measuring 6 inches by 9 inches. Cut out, again, leaving a fairly wide 1/4 inch seam allowance.

Sew these two pieces together to create the background.


Now prepare the applique pieces.

Trace the pattern pieces onto the paper side of the freezer paper. Cut these out on the line.

Iron each piece onto the appropriate fabric. Cut them out leaving an extra 1/4 inch seam allowance.

Now it is time to baste the pieces. First clip any inside curves. For this block you will need to clip the tree pieces.


Now baste the pieces. Fold over the seam allowance to the back of the piece. Stitch in place using a long running stitch.


Lay the pieces out on the background. You are now ready to start appliqueing. I will continue on the next post because Blogger will only let me download these photos.


Wednesday, May 13, 2009

Lunaria

Now to continue the stroll through my garden. This beautiful purple flowering plant is called Lunaria.


About 20 years ago, my neighbour gave me a little unmarked packet of seeds. They were a gift from her sister, but her husband would not let her plant them in their garden. She told me that her sister had given her instructions on how to plant them. "Just sprinkle some of the seeds and let them grow," she told me. She didn't know the name of them or what they would look like. I planted them anyway and now I am ever so glad that I did! Each spring I am rewarded with a beautiful purple garden!


Lunaria is a biennial. The seeds are planted in the summer and grow into small plants during the first year. They go dormant over the winter and start to grow again early in the spring. These things are amazing! They grow about two feet in just a month or so. They are also one of the earliest bloomers in the garden. The plant goes on to create wonderful see-through seed pods. These can be dried and used in dried arrangements. This round, silver pod also gives the plant its common names of Honesty (because it is see-through) and Money Plant or Silver Dollar Plant.

I have never planted this plant since those first seeds that my neighbour gave me. The seeds just plant themselves. They come up all over my garden. I usually leave them where they are until they finish blooming. Then I pull them out or leave them, depending on where they are. I always make sure there are some healthy looking ones that are allowed to go to seed. I also look at their colour. For some reason those first plants were all purple, but since then I often get white Lunaria. I love the white ones and will usually leave them to go to seed in the hopes of getting more white flowering plants.

Family: Brassicaceae. Genus: Lunaria. Species: L. annua.
Common names: Silver Dollar Plant, Money Plant, Honesty


House Block for the Yokohama/Toronto Wallhanging

This is the 4th block in the Yokohama/Toronto wall hanging. As you can see, I didn't like the way the windows kind of disappeared in the block, so I embroidered a small blanket stitch around the windows and a stem stitch to mark the window panes.
The instructions are here.

Monday, May 11, 2009

Euphorbia

My garden is full of interesting plants, but perhaps the most interesting is this beautiful yellow Euphorbia. I love the yellow/green colour of this herbaceous plant. It creates a bright spot in my garden at this time of the year. In our climate it is a hardy perennial, coming up early each spring. Euphorbia are one of the largest and most complex genera of flowering plants. There are over 2160 species! They include many that look more like succulents or cactus-like plants. The common indoor plant at Christmas time, Crown of Thorns, is also a Euphorbia. I have several indoor plants that are considered Euphorbia. Botanists have tried to subdivive this genera but have not been successful. These plants are so diverse that my DD took a botany course at university a few years ago, dealing solely with this genera.
The most interesting things about this plant are the flowers which are really bracts, or coloured leaves at the end of the stems. The centre of these coloured bracts contain the unisexual flower parts. This is similar to Poinsettias, which are also Euphorbia (E. pulcherrima) Euphorbia are sometimes called Spurge. The word 'Spurge' comes from the word 'to purge' due to the early use of this plant's sap as a purgative. Needless to say, the sap can be highly toxic. It can cause skin irritations and affect mucous membranes. It is important to handle this plant with care. But I have never experienced any problems with it. It is one of my favourites!


Family: Euphorbiacceae. Genus: Euphorbia. Species: E. epithymoides.
Common name: Spurge

Saturday, May 9, 2009

Pasque Flower

Some of my favourite early spring plants are the Pasque Flowers. These perennials are one of the first plants to come up in the spring. Pasque refers to Passover and they are called this because they tend to flower at that time of the year. Although in my neck of the woods, it is usually still too cold then. In my garden they bloom during the month of May.

I have several varieties in my garden. A few years ago I bought a white flowering one, but I can't find it this year. I think I will go out and buy another one this year. This is a close up of a lovely fuchsia coloured one.

Family: Ranunculaceae. Genus: Pulsatilla.
Common name: Anemone, Prairie Crocus
This plant is highly toxic! It produces carcinogenic toxins. It can slow the human heart rate. It can lead to hypotension and coma. This plant has been widely used in folk medicines as a sedative and to induce abortions and childbirth. Needless to say, as pretty as this plant is, I won't be eating any part of it!

Thursday, May 7, 2009

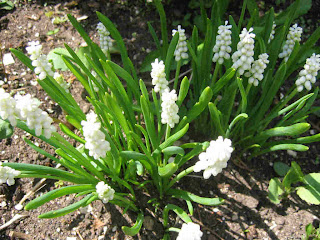
Blue and White Muscari

I love the little Muscari that are blooming in my garden. I have many of the blue variety and a few of the white. They are one of my favourite spring flowers.


They are grown from bulbs which are planted in the fall. Once planted, however, they tend to multiply rapidly in good soil and come back up each spring.

Family: Hyacinthaceae. Genus: Muscari.
Common name: Grape Hyacinth


Wednesday, May 6, 2009

Block #3 of A Tale of Two Cities

This is the completed block #3 for the Yokohama/Toronto wall hanging. It is called 'Maple Leaf'. Sorry I did not post it yesterday, but I did not have a picture of it. As you can see, it is another simple block in the nine-patch category. You will need the same templates as block #2 - a 3inch square and a 3inch half triangle.

You will need to:
  • mark and cut two 3in X 3in squares of background fabric.
  • mark and cut four triangle units of background fabric.
  • mark and cut three 3in X 3in squared of your choice of fabric for the leaf
  • mark and cut four triangle units of leaf fabrics

Complete the stem applique piece by following the applique instructions mentioned yesterday. Sew triangle units together into squares. Lay your pieces out to match the photo. Sew them together.

If you have any questions, just e-mail me. Happy Piecing!

Tuesday, May 5, 2009

Continuation of Freezer Paper Applique Method

Freezer Paper Applique - Part II

Continue to take small stitches along one edge of the applique piece. End off.
Start in the same manner on the other side of the piece. When you have gone about halfway, you will need to take out the freezer paper. You do this by cutting and removing the basting stitches. Then slide something (I use a small knitting needle) to separate the freezer paper piece from the fabric. Then pull it out.


Carefully fold the applique piece back on its original fold and continue to applique to the end of the piece. End off.
The stitches should look something like this on the back.


The front should look like this. You are now ready to attach this piece to the Maple Leaf Block.

Block #3 Maple Leaf

We will now do Block #3. It is called Maple Leaf. Maple trees are abundant in our country. In fact, we even use it on our flag to symbolize our nation. Japan has maple trees too. I love the lace-like leaves of the Japanese Maples! I have included this block to show our similarities. We will begin by hand appliqueing the stem to one of the corner units of this block.
Hand Applique - Freezer Paper Method - Part I

Hand applique is a lot of fun. This is the method which I use for beginners. First find the pattern piece that you wish to applique. Next take the freezer paper. You will notice that it has a waxy side and a dull side. Place the freezer paper waxy side down over the pattern. Trace the pattern onto the back of the freezer paper with a pencil.


Next, cut the pattern out on the drawn line.
Place the freezer paper piece onto the back side of the fabric you wish to use for the stem. (green) With an iron set to the cotton setting, press the freezer paper to the back of the fabric. (The nice thing about freezer paper is that it can be re-used. If you have made a mistake placing the freezer paper piece on the wrong fabric or if you want to re-position it, you can just take it off and iron it again.) Then cut the piece out, leaving a scant 1/4inch seam allowance around the entire piece.


Now turn the edges down over the freezer paper and baste. Use a large running stitch. Some people like to press the piece at this point, but I find that isn't really necessary.

Once the piece has been basted, place it on the background fabric as directed in the pattern. In this case it will go diagonally across the piece. Pin it in place. This is the bias of the background fabric so be careful not to stretch it.


You are now ready to start sewing. Work from right to left if you are right handed. Try to use a thread colour that closely matches the colour of the piece being appliqued. I am using a contrasting colour so you can see it. At least I hope you can see it! Knot the end of the single thread and bring it from the back to the front catching the applique piece by about two threads. I know this doesn't sound like much, but you don't want huge stitches to show on the front. Next, bring to needle down into the background fabric right beside where you just came up in the applique piece. Run the needle along on the back, coming up a short stitch farther and again taking about two threads of the applique piece.


Please go to Hand Applique Part II for more photos. Blogger would only let me put this many on this post.


Sunday, May 3, 2009

Bergenia

Today was a beautiful spring day. The air was cool, but the sun was warm. Needless to say I spent most of it in my garden. To my great delight I discovered that my Bergenia are in bloom! I love these plants. I planted my first one about 20 years ago. Since then they have multiplied and delighted me each spring.

Family: Saxifragia. Genus: Bergenia. Species: B. cordifolia.
Common name: Elephant's Ears
This plant's common name is Elephant's Ears because of its large, round leaves. It is a perennial evergreen. It's large leaves give the garden some interest even in winter. The flowers are borne in large clusters fairly early in spring. It is very hardy in our climate, probably because it is native to China. Sometimes the leaves look a little beaten up after a long cold winter, but it is easy to just pick off the brown, dried ones and the plant immediately looks good again. It can easily be divided, although it is best to do that after it has flowered.

I often find huge garden snails at the base of my plants in early spring and also during hot weather. This seems strange since Bergenia are apparently not affected by snails and slugs. Perhaps their large leaves provide protection from heat and cold. I have heard that cocoa beans can be put at the base of the plants to keep slugs and snails away. I have not tried this as yet. With my luck the snails would just go and sit under a plant which they would find delicious!

Friday, May 1, 2009

Helleborus

This is my Helleborus. Not very exciting, is it? I thought it was dead, but a new shoot came up in the last few days. I plan to take better care of it now that I am able to get around a bit better. I love this plant! I am not sure which species I have.

Family: Ranunculaceae, Genus: Helleborus
Common name: Christmas Rose

Lamium maculatum

On my continued journey through my garden I want to show you my Lamium maculatum, commonly known as Dead Nettle. It is growing in a very sunny spot. I don't know how it got there. I planted it in the shade in another part of the garden, a long way from this one. The ones which I planted are very small and slow to come up. They are in the shade. Apparently this plant likes shade to partial shade., but this one is in full sun. Go figure! I will probably move it to a more shady spot because here the soil is poor and it gets very hot and dry in the summer.

Lamium is a herbaceous perennial. Mine has green leaves with a white stripe down the centre. The flowers are light mauve. It is in the Lamiaceae family. It is low growing, reaching only about 6 inches to 12 inches. It blooms from early spring through the summer.

Family: Lamiaceae, Genus: Lamium, Species: L. maculatum
Common name: Dead Nettle